Registering a monitor
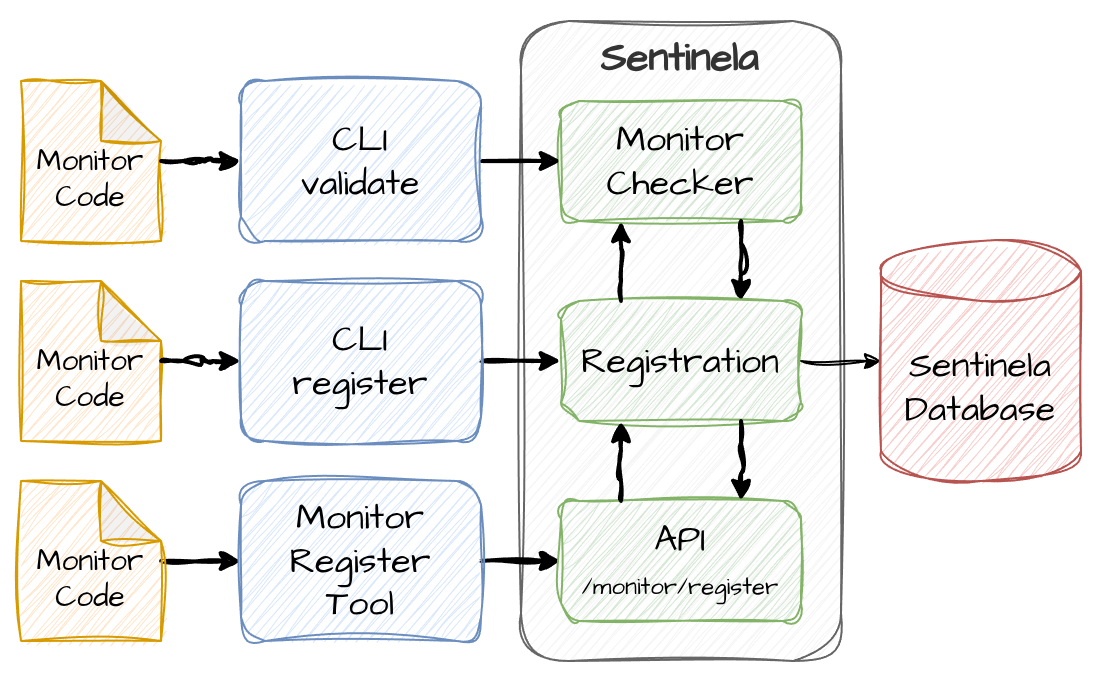
Once the monitor code has been created, it needs to be registered on Sentinela. The process for registering a new monitor or updating an existing one is the same.
Caution
Although monitor registration and validation are controlled by Sentinela, it is not possible to completely prevent malicious behavior, as monitors are ultimately allowed to import and execute arbitrary Python code. Sentinela does apply some safeguards during validation, such as blocking nested imports and certain prohibited imports, but these checks are intended as error-prevention measures rather than a complete security boundary. Therefore, both the Sentinela platform and the monitor development process operate under a trust-based model.
The registration process goes through a monitor code validation. This process is explained at monitor validating documentation.
Monitor Composition
A monitor consists of:
- Main Code File: The .py file containing the monitor's definition.
- Optional Additional Files: Supporting resources used during the monitor's execution, such as SQL query files or other data files.
- Optional Documentation File: A README.md file providing documentation for the monitor. This file is extracted separately from other additional files and stored as the monitor's documentation. It is not included in the additional_files object.
Registration Process
The registration process can be done through the CLI or using a HTTP request to Sentinela.
CLI
To register a monitor using the CLI, follow the instructions in the command line interface documentation.
HTTP request
POST monitors/register/{monitor_name}
Parameters:
- {monitor_name} is the name of the monitor being created or updated.
The payload should include the following fields:
- monitor_code: The content of the monitor’s main .py file content.
- additional_files: Optional field with an object where the keys are the names of additional files, and the values are their content. If a file named README.md is included, it will be extracted and stored as the monitor's documentation, not as an additional file.
Example:
{
    "monitor_code": "...",
    "additional_files": {
        "search_query.sql": "select * from users where id = $1;",
        "README.md": "# My Monitor Documentation"
    }
}
Responses
The response will contain the status of the registration process. The field status will be set to monitor_registered if the monitor was successfully registered and the monitor id will be in the monitor_id field.
Example:
{
    "status": "monitor_registered",
    "monitor_id": 123
}
If the registration fails, the status field will be set to error and the field message will contain the error message. Depending on the error, additional fields may be present to help diagnose the issue.
Example:
{
    "status": "error",
    "message": "Module didn't pass check",
    "error": "Monitor 'my_monitor' has the following errors:\n  'monitor_options' is required"
}
To simplify the registration process through a HTTP request when running Sentinela locally, a Python script, available in the tools folder, can be used.
The following example demonstrates how to use the script to register a new monitor:
register_monitor \
    my_monitor \
    monitors/my_monitor/my_monitor.py \
    monitors/my_monitor/search_query.sql \
    monitors/my_monitor/update_query.sql
In this example:
- my_monitor is the name of the monitor being registered.
- monitors/my_monitor/my_monitor.py is the main monitor file.
- monitors/my_monitor/search_query.sql and monitors/my_monitor/update_query.sql are additional files used by the monitor.
Monitor execution
Once registered, Sentinela will load all registered monitors during its next monitor load cycle. This cycle is determined by the monitors_load_schedule setting in the configs.yaml file.